Attention: Here be dragons
This is the latest
(unstable) version of this documentation, which may document features
not available in or compatible with released stable versions of Redot.
Checking the stable version of the documentation...
Exporting for dedicated servers
If you want to run a dedicated server for your project on a machine that doesn't
have a GPU or display server available, you'll need to run Redot with the headless
display server and Dummy audio driver.
Since Redot 4.0, this can be done by running a Redot binary on any platform with
the --headless command line argument, or running a project exported as
dedicated server. You do not need to use a specialized server binary anymore,
unlike Redot 3.x.
Editor versus export template
It is possible to use either an editor or export template (debug or release) binary in headless mode. Which one you should use depends on your use case:
Export template: Use this one for running dedicated servers. It does not contain editor functionality, and is therefore smaller and more optimized.
Editor: This binary contains editor functionality and is intended to be used for exporting projects. This binary can be used to run dedicated servers, but it's not recommended as it's larger and less optimized.
Export approaches
There are two ways to export a project for a server:
Create a separate export preset for the platform that will host the server, then export your project as usual.
Export a PCK file only, preferably for the platform that matches the platform that will host the server. Place this PCK file in the same folder as an export template binary, rename the binary to have the same name as the PCK (minus the file extension), then run the binary.
Both methods should result in identical output. The rest of the page will focus on the first approach.
See Exporting projects for more information.
Exporting a project for a dedicated server
If you export a project as usual when targeting a server, you will notice that
the PCK file is just as large as for the client. This is because it includes all
resources, including those the server doesn't need (such as texture data).
Additionally, headless mode won't be automatically used; the user will have to
specify --headless to make sure no window spawns.
Many resources such as textures can be stripped from the PCK file to greatly reduce its size. Redot offers a way to do this for textures and materials in a way that preserves references in scene or resource files (built-in or external).
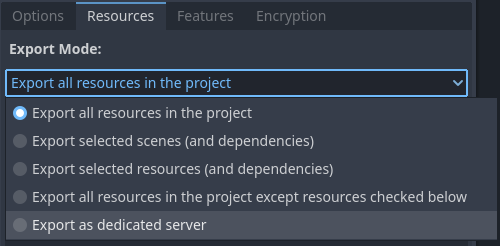
To begin doing so, make sure you have a dedicated export preset for your server, then select it, go to its Resources tab and change its export mode:

Choosing the Export as dedicated server export mode in the export preset
When this export mode is chosen, the dedicated_server feature tag is
automatically added to the exported project.
Note
If you do not wish to use this
export mode but still want the feature tag, you can write the name
dedicated_server in the Features tab of the export preset.
This will also force --headless when running the exported project.
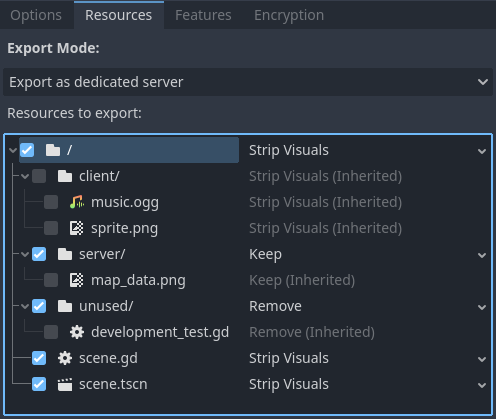
After selecting this export mode, you will be presented with a list of resources in the project:

Choosing resources to keep, keep with stripped visuals or remove
Ticking a box allows you to override options for the specified file or folder. Checking boxes does not affect which files are exported; this is done by the options selected for each checkbox instead.
Files within a checked folder will automatically use the parent's option by default, which is indicated by the (Inherited) suffix for the option name (and the option name being grayed out). To change the option for a file whose option is currently inherited, you must tick the box next to it first.
Strip Visuals: Export this resource, with visual files (textures and materials) replaced by placeholder classes. Placeholder classes store the image size (as it's sometimes used to position elements in a 2D scene), but nothing else.
Keep: Export this resource as usual, with visual files intact.
Remove: The file is not included in the PCK. This is useful to ignore scenes and resources that only the client needs. If you do so, make sure the server doesn't reference these client-only scenes and resources in any way.
The general recommendation is to use Strip Visuals whenever possible, unless the server needs to access image data such as pixels' colors. For example, if your server generates collision data based on an image's contents, you need to use Keep for that particular image.
Tip
To check the file structure of your exported PCK, use the Export
PCK/ZIP... button with a .zip file extension, then open the resulting
ZIP file in a file manager.
Warning
Be careful when using the Remove mode, as scenes/resources that reference a removed file will no longer be able to load successfully.
If you wish to remove specific resources but make the scenes still be able
to load without them, you'll have to remove the reference in the scene file
and load the files to the nodes' properties using load() in a script.
This approach can be used to strip resources that Redot doesn't support
replacing with placeholders yet, such as audio.
Removing textures is often what makes the greatest impact on the PCK size, so it is recommended to stick with Strip Visuals at first.
With the above options used, a PCK for the client (which exports all resources normally) will look as follows:
.
├── .godot
│   ├── exported
│   │   └── 133200997
│   │       └── export-78c237d4bfdb4e1d02e0b5f38ddfd8bd-scene.scn
│   ├── global_script_class_cache.cfg
│   ├── imported
│   │   ├── map_data.png-ce840618f399a990343bfc7298195a13.ctex
│   │   ├── music.ogg-fa883da45ae49695a3d022f64e60aee2.oggvorbisstr
│   │   └── sprite.png-7958af25f91bb9dbae43f35388f8e840.ctex
│   └── uid_cache.bin
├── client
│   ├── music.ogg.import
│   └── sprite.png.import
├── server
│   └── map_data.png.import
├── test
│   └── scene.gd
└── unused
│   └── development_test.gd
├── project.binary
├── scene.gd
├── scene.tscn.remap
The PCK's file structure for the server will look as follows:
.
├── .godot
│   ├── exported
│   │   └── 3400186661
│   │       ├── export-78c237d4bfdb4e1d02e0b5f38ddfd8bd-scene.scn
│   │       ├── export-7958af25f91bb9dbae43f35388f8e840-sprite.res  # Placeholder texture
│   │       └── export-fa883da45ae49695a3d022f64e60aee2-music.res
│   ├── global_script_class_cache.cfg
│   ├── imported
│   │   └── map_data.png-ce840618f399a990343bfc7298195a13.ctex
│   └── uid_cache.bin
├── client
│   ├── music.ogg.import
│   └── sprite.png.import  # Points to placeholder texture
└── server
│   └── map_data.png.import
├── project.binary
├── scene.gd
├── scene.tscn.remap
Starting the dedicated server
If both your client and server are part of the same Redot project, you will have to add a way to start the server directly using a command-line argument.
If you exported the project
using the Export as dedicated server export mode (or have added
dedicated_server as a custom feature tag), you can use the dedicated_server
feature tag to detect whether a dedicated server PCK is being used:
# Note: Feature tags are case-sensitive.
if OS.has_feature("dedicated_server"):
    # Run your server startup code here...
    pass
// Note: Feature tags are case-sensitive.
if (OS.HasFeature("dedicated_server"))
{
    // Run your server startup code here...
}
If you also wish to host a server when using the built-in --headless command
line argument, this can be done by adding the following code snippet in your
main scene (or an autoload)'s _ready() method:
if DisplayServer.get_name() == "headless":
    # Run your server startup code here...
    #
    # Using this check, you can start a dedicated server by running
    # a Redot binary (editor or export template) with the `--headless`
    # command-line argument.
    pass
using System.Linq;

if (DisplayServer.GetName() == "headless")
{
    // Run your server startup code here...
    //
    // Using this check, you can start a dedicated server by running
    // a Redot binary (editor or export template) with the `--headless`
    // command-line argument.
}
If you wish to use a custom command line argument, this can be done by adding
the following code snippet in your main scene (or an autoload)'s _ready()
method:
if "--server" in OS.get_cmdline_user_args():
    # Run your server startup code here...
    #
    # Using this check, you can start a dedicated server by running
    # a Redot binary (editor or export template) with the `--server`
    # command-line argument.
    pass
using System.Linq;

if (OS.GetCmdlineUserArgs().Contains("--server"))
{
    // Run your server startup code here...
    //
    // Using this check, you can start a dedicated server by running
    // a Redot binary (editor or export template) with the `--server`
    // command-line argument.
}
It's a good idea to add at least one of the above command-line arguments to start a server, as it can be used to test server functionality from the command line without having to export the project.
If your client and server are separate Redot projects, your server should most likely be configured in a way where running the main scene starts a server automatically.
Next steps
On Linux, to make your dedicated server restart after a crash or system reboot, you can create a systemd service. This also lets you view server logs in a more convenient fashion, with automatic log rotation provided by systemd.
If you have experience with containers, you could also look into wrapping your dedicated server in a Docker container. This way, it can be used more easily in an automatic scaling setup (which is outside the scope of this tutorial).